From Rough Cut to Release: DIY Set Design for Music Videos
A hands-on guide to crafting spaces, props, and practical effects that illuminate your song without breaking the budget.
- Define the story your set will tell before you shop or build
- Reuse and adapt everyday objects to create definable spaces
- Prioritize lighting and blocking to save time on shoot days
- Plan safe practical effects with a clear safety checklist
Scene as character: designing space that speaks the song
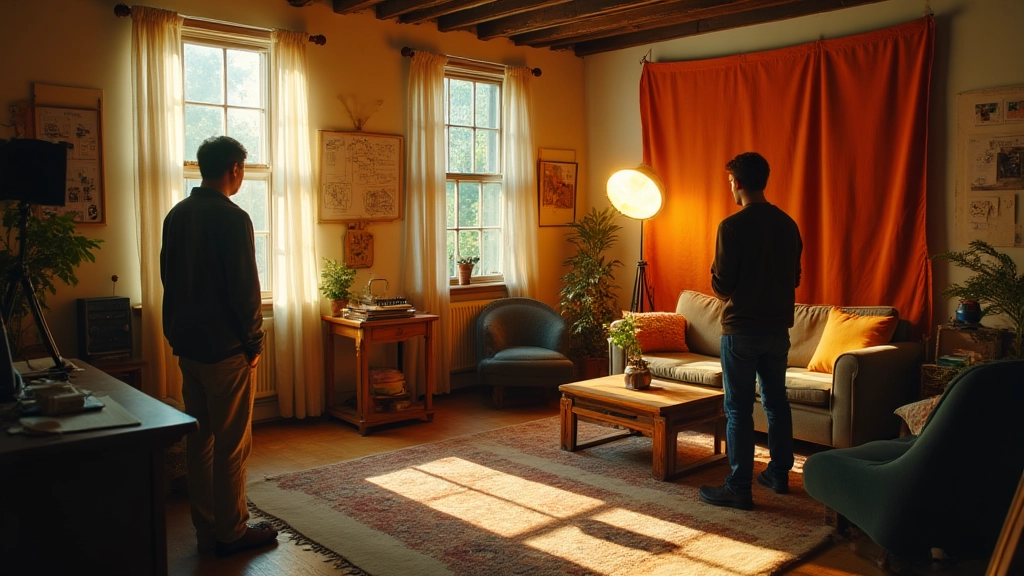
I stood in a small living room lit by a desk lamp and began mapping the set on a corkboard. A striped curtain became a city night; a stack of old suitcases formed an archive of memory. The first shot would be a slow push through a doorway, and I knew that every prop, every surface, every crack of footsteps would read in the frame. The set wasn’t a backdrop; it was a second voice for the singer. This realization became the compass for everything that followed.
As a director-writer pair, my collaborator and I committed to the premise that the space should earn its beat. If a prop doesn’t move the story forward, it doesn’t belong here. If a light cue doesn’t sharpen a lyric, we skip it. The result is a set that breathes with the song rather than claps to its tempo.
The budget blueprint: pragmatic choices that pay off
Indie artists frequently navigate a spectrum from artful minimalism to bold, high-impact visuals. The trick is to maximize storytelling payoff per dollar by doubling down on a few strong ideas and reusing assets wherever possible.
- Lock in a core concept and the single visual motif that anchors the set.
- Catalog scenes and prop needs, then consolidate duplicates to avoid waste.
- Source affordable items from thrift stores, flea markets, and your own space, and borrow where you can.
- Rent standout items only when they offer a clear, reusable payoff across songs or projects.
Case in point: for a moody bedroom-to-rooftop sequence, we used a painted backdrop, a portable LED panel, and a lightweight stair-step prop that doubled as a balcony railing. The same pieces could be reimagined for a hallway or storefront in a later track, preserving value.
Designing zones that serve the shoot
We break the space into three functional zones to keep blocking crisp and avoid clutter on camera. It’s a simple framework, but the payoff is enormous when you’re counting minutes between takes.
- Performance zone: allocate room for movement and camera tracking without crowding the frame.
- Narrative zone: position memory cues and symbolic props where they read clearly but don’t obstruct the performer’s line of sight.
- Transition zone: create a corner or doorway that allows a rapid shift in angle or mood without a full reset.
In practice, this meant a compact corner desk for the performer to lean into, a doorway of chiffon-as-curtain for a soft reveal, and a small step that could become a rooftop edge when the camera traveled along a track. The geometry of the space became a storytelling device in its own right.
Props and practical effects that punch above their weight
Practical effects are fast, tactile, and repeatable. They also keep your crew light and nimble. Here are three approaches that deliver real mood without blowing the budget.
Forced perspective with everyday objects
Stack crates of varying heights and build a small doorway cutout. By placing the performer closer to the camera than the background elements, you create a convincing depth that reads large on screen without a large set piece.
Hidden track for movement cues
Install a discreet string or lightweight wire system to create gentle movement in backdrops or curtains. Keep the motion subtle and in sync with the track so the audience perceives intention, not machinery.
Low-cost light tricks and haze
Small haze machine or a handheld smoke pen paired with a fan can reveal beams and texture in a way that feels cinematic. Color the beams with inexpensive gels or white balance adjustments to suit the chorus mood.
A set is a character when it helps the artist tell the story, not a prop shelf you never touch.
Mini stories from the field
Story one unfolds in a rural attic where a guitarist stages a rooftop silhouette with cardboard and a string-lit grid. Story two happens in a rehearsal space where a translucent curtain doubles as an escape motif in the lyric. Story three plays out on a kitchen floor where mismatched dishes refract light and become a micro audience for a whispered verse. Each vignette demonstrates how limited resources can still convey scale and emotion.
Lighting and camera: shaping the mood before you press record
Light is storytelling energy. You can bend mood with a few simple choices: direction, temperature, and intensity. Start with a three-point plan and layer with shadows and glow to add depth.
- Key light: a soft source near eye level to sculpt the face and keep eyes readable.
- Fill light: soften shadows but preserve contrast for dimension.
- Back light: separate subject from background and add a rim highlight for separation.
Color palettes are your second instrument. Cool blues suggest introspection; warm ambers foster vulnerability; magenta accents can signal a chorus shift. If you have color gels, use them to tint walls or fabrics to unify the frame without painting every surface.
Blocking, storyboards, and a sprint plan for the shoot day
Storyboarding is a living script that guides camera rhythm and prop placement. In a tight schedule, you need a plan that adapts on the fly. Here’s a practical sprint plan that fits a single day on a small budget.
- Rough storyboard: sketch three core beats that define the track arc.
- Blocking run-through: rehearse each beat with the musician and a camera on a tripod to measure timing.
- Prop map: assign each beat a prop cue or lighting change to signal transition.
- Shot list refinement: translate beats into precise shots with timing and framing notes.
Mini-case: a bedroom performance evolves into a rooftop moment when a makeshift platform slides into frame and the camera tracks the transition. The operator remains within arm’s reach of the action, and the spatial jump becomes a deliberate narrative decision rather than a mere trick.
Editing the set into the song: from rough cut to release
Postproduction is where the set gains its final bite. Consistent color management keeps mood coherent across spaces, and careful editing makes the physical world feel like a single shared stage.
- Rough cut: assemble shots to a rhythm that matches vocal timing and emotional peaks.
- Intra-scene color continuity: ensure similar warmth or coolness across the performance and the set reads as a cohesive unit.
- Transition polish: use subtle cross dissolves or match cuts to smooth spatial jumps without breaking the viewer’s immersion.
- Final pass: add micro-details such as reflective highlights on metal props, texture on fabrics, and subtle edge glow on key silhouettes to sharpen the on-screen texture.
Two quick storytelling edits: (1) cut to a prop that mirrors a lyric for a moment of visual echo; (2) pull back to reveal the set in motion as the chorus lands, letting the space become a living character rather than a background.
Distribution and discovery: releasing a music video with impact
After you finish, plan a release that respects your fanbase and maximizes reach. A ladder from teaser to full video helps your audience follow the arc you built in the set.
- Teaser: 10–15 seconds featuring a striking visual beat to spark curiosity.
- Premiere: host a live or virtual event with chat to invite reactions to the set choices in real time.
- Week-one content: publish behind the scenes, a breakdown of the set design, and a lighting plan to sustain engagement.
- Lifecycle: consider alternate cuts or lyric videos to extend the work’s shelf life.
In a recent release, a duo published a short BTS montage focusing on thrifted set pieces and light tricks. The video gained momentum as fans shared their own recreations with a dedicated hashtag, broadening the video’s life beyond the initial premiere.
Putting it all together: a practical field guide you can reuse
Think of your set as a toolkit you can carry from track to track. Core ideas include concept-first planning, modular and reusable pieces, safe practical effects, and tight collaboration with your DP and performer. The most memorable sets are the ones that disappear into the moment they illuminate rather than distract from the music. And when you document your process, you create a template others can follow, remix, and learn from.
Checklist you can use today
- Define the core visual motif 1
- Divide space into performance, narrative, transition zones 2
- Gather affordable props and test a tiny rig 3
- Create a simple three-source lighting plan 4
Equipment snapshot (budget-minded)
| Item | Use | Budget |
|---|---|---|
| LED panel | Key light and fill | Under $60 |
| Clamp-on backlight | Separation and glow | Under $25 |
| Smoke pen | Atmospheric beams | Under $40 |
| Backdrops | Texture and depth | Under $30 |
Set design lives between art and physics; your choices bend light and time to tell the story.
Hear what these choices do to your own song.
Upload stems or a finished track, choose a reference direction, and compare a private Moozix mix before you export anything.